My original Sector Towers were one of the first structures to go up. A little hastily and spindely I might add so late this winter I upgraded the structure based off the originals. Some of this was prompted by me getting ever closer to sector timing for my circuit via a friend of mine, BT. We're not quite there yet, but the custom chip has been developed, Copper gaps are in (to register cars going past) and soon it'll be all up and running for lap timing as well as sector timing just like a real F1 race! The new structures were made primarily of stick and sheet balsa wood, a little styrene and graphics. They certainly look more robust and are easily spotted from the drivers stations.
Friday, May 14, 2010
Thursday, January 21, 2010
WLF1 Ring - Night Racing
Night racing is certainly as much fun as day racing on the Ring. I haven't taken specific night shots in quite some time although there has certainly been a lot of lighting added. These are really just more overview type shots but it gives a good sense of what to expect when lapping the circuit at night. Still a few more power issues for me to address though as some of the lights are not illuminating due to bad cell phone transformers or inadequate power. Both the cell and radio towers have red LEDs on top. Also the crane has a series of lights. Still though just small details that very few will notice. Of course I always notice them!
WLF1 Ring - Main Straight Additions Part 2
For the last part of the main straight I wanted to add team control boxes. Typically these are put on the pit wall, but due to my limited space there I opted for the bleacher side of the track and the walkways provide teams a way to get team members over there. These were more gator board and styrene pieces for the main components. The roof is scored clear lexan. The stools are cut out patterns that I folded up an added supoport tubes then glued them to the buildings. TV screens are graphics mounted to a strip of styrene and are color coded to the adjacent pit boxes. I dressed them up with some numbers and WLF1 Ring logos to add a touch more detail. If you're ever over take a close look at those monitors, you might find an interesting camera shot or two!
WLF1 Ring - Main Straight Additions Part 1
This next batch of modeling has been quite a while in the making. It was always my intent to have the drivers side of the Main Straight complete with overhead walkways, bleachers and Team Control boxes. The bleachers are pretty straightforward and based off the same construction I outlined in an earlier post. To make the overhead walkways and towers I started with gatorboard to make the floors of the towers. I grabbed a large diameter bowl form the kitchen to cut the radiuses into the gator board. Bowls make great circle templates! After that I spaced out the floors using 1/2" gatorboard support posts. Then I measured the outer skin pieces onto sheet styrene. I scored the outer side of the skin to both help the piece naturally curve as well as give some indication of paneling. Corners were dressed up in red painted round dowels and then a few other red styrene parts to add some detail. Staircases were fabricated to let people out on the far side of the pitlane into the bleacher area. From there I moved on to the actually crosswalks. These started as a 1/2" piece of gator board for the floor, and the 1/4" gator sides. I capped the unfinished edges of gator with wood planks and painted the structures white. Then I added corrugated silver flooring material and black crochet mat for the railing fences. Later I added Christmas LED lights to the underside to help illuminate the area around the walkways. I would always suggest using LEDs when available. You are almost guaranteed they will never burn out. So the pit lane is looking much more complete from all vantage points. A few figures were painted up and glued down to add to the ambiance.
WLF1 Ring - Midfield
I did some more tree and shrubbery work in the midfield area of the Ring. Primarily adjacent to the Senna Esses. I spent a little more time on the trees because I wanted a fuller look to break up the circuit from front to back. It in no way inhibits the drivers view and actually provides a cool shot of the cars screaming through the trees. I used the same woody weeds from my back yard, but this time I bought some multi colored green and brown yarn and pulled it apart to make it all hairy. Then I wrapped the trunks up with the yarn and doused with hairspray and covered in modeling flax of different colors. Time consuming for sure but worth the effort.
WLF1 Ring - Building Under Construction
I had this idea of having a building under construction back in the industrialized area of my circuit. The main reasoning was I wanted to build a Tower Crane to sit atop it! The tower for the crane stared out as two styrene pre-fab trusses. I then cut additional struts to make a box truss. The top truss that the hook slides along was done in the same fashion but in a triangular shape. The cab was made from sheet styrene and I even put a little figure in there. The crane has 3 red LED lights in it, one on top, one at the tip and one inside the cab. I still need to run a power supply to it, but it is all wired and ready to go. The building is a custom made piece of aluminum that I dressed up with some rough structure to make it look like it is being built. I thought it would be cool to have a beam being hoisted and as a tribute to the hazard filled building days of the 1930's, I put a guy up there checking out the track, one hell of a view I am sure! I dressed up the supporting deck with a plant laden sidewalk and curbing. Also you can see the final curved bleachers from the previous post. I need to do a little more transition work back there but its one of those places that very few people will actually notice. That’s where the camera shots really add some fun to track building. You can place that camera in so many interesting spots your eyes could never go. I think I have years of interesting shots I can take of White Lake F1 Ring!
WLF1 Ring- Bleachers
Greetings from the Ring! It's hard to believe its been six months since my last post. I've certainly done some additions over the last several months so I am going to bombard the site with several new posts to accompany all the pictures.
I'll start with this little bleacher set I made. These pictures show the set in various states of progress. The finished sets you'll see in a post or two from now. I tried to document my construction with photos but I tend to work more and take pictures less. I thought this would be a good one to show though because I think most tracks can certainly use some bleachers here and there and they are very easy to make. I used Pine and Balsa wood for the main pieces and these shots show the table I work on for everything. Notice that it is gridded, this is extremely useful to make sure you are fabricating with good right angles, parallels, perpendiculars and increments. I cut the pieces in assembly line fashion, cutting all of one length at a time, etc. This makes a project like the 4 sets of bleachers I produced move along much more quickly. The ruler was taped down to the table and the bleacher risers were glued together right along the edge of it to make sure spacing was good. You need four risers to make a bleacher set of 3 spans. The spans were cut from balsa wood, and in the instance of this set of bleachers I made it curve slightly by cutting the middle span at an angle. I wanted this one to curve because it was going to sit on the outside of a curve in the back corner of my layout. After it was all dried I painted it and then fabricated a simple awning structure from more pine and a corrugated paper. You'll see the finished results in the next post!
Tuesday, July 28, 2009
WLF1 Ring - Mid Views
Here's a couple shots from mid track viewing northwest and northeast respectively. With summer beyond its mid way point I am gearing up for some race nights and winter modelling, but for now I'll keep enjoying the sunshine and the 2009 Formula One World Championship shootout. Next race Valencia, Spain.
WLF1 Ring - Park Ferme International Walk
This ones fairly straightforward and adjacent to the sidewalk that connects park ferme and the pit lane. Flagpoles were made from tubular styrene and the flags were wrinkled up a bit and glued to make them look like they're waving in the wind. Pea gravel was used to fill in the area between the sidewalk and back rock terrace. You have to have some international presence at an international f1 circuit!
WLF1 Ring - Fountain Park and Fountain Bridge
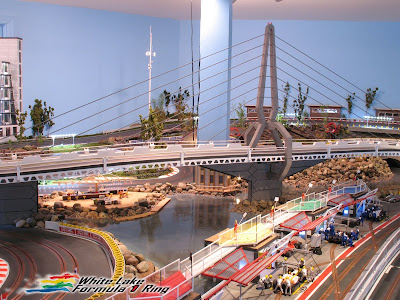
This Marshal hole, once the largest, has given up some real estate to make way for the Fountain Park and Fountain Bridge. The fountain is a small scale "Homemedics" water feature for relaxation. Its about 14" in diameter and came with a few slab rocks, water filter and light. I enhanced it for the park fountain by sinking the bowl below the track surface to bring the scale down some. I scavenged the back yard for slab like sandstone and re piled my rocks in a conical fashion for the fountain. Water drips from just below the top layer and down over the sandstone. A cool use for a $15 fountain and a beautiful centerpiece to the park. Sidewalks surround the fountain and are flanked on four sides by park benches made from toothpicks. The benches are an asymmetrical contemporary design as you might expect from me by now.
The Fountain Bridge started with a piece of perforated aluminum I've had for years now. It makes up the floor surface. From there I made a wooden spire that peaks out over the center of the fountain. It is tethered back to the floor surface with cable (dowels) to create an asymmetrical cable stay configuration. The railings started with plastic conduit clasps for the uprights and railings are red painted styrene strips. Lets take a walk to the fountain in between race warm-up sessions...
One last detail here are the blue and white barricades I made from wood planks (slightly smaller then popsicle sticks) I lined up about fifty sticks and masked them off for painting the blue and white stripes. Then 1 plank is cut in half, one half is cut in thirds and then glued together to make an angled barricade. I've placed these in various "Keep Out" places and the blue and white color is a nice contrast to the predominant reds of the architecture.
WLF1 Ring - Sky Scraper
This ones in progress, but well on its way...
A 10 story Skyscraper fills a portion of the North West corner of the Ring. This was fabbed up from 3/8" rectangular dowels. Its really only two sides as the other two sides are never visible. I build these on the grided table in my basement. A grid is VERY helpful to keep things parallel and perpendicular especially when working in scale. The windows are actually contact paper, albeit metallic and applied to sheet plastic to add some rigidity. The contact paper is the type you line cubbards and shelves with. Not my favorite, but still effective. Its always good to experiment with things and use that imagination. Hardware stores, super stores and others are full of potential modelling parts. I just wander the aisles and look at things and how they might be applied to 1/32 scale modelling. The SS Tower will get some additional window mullions, doors, antennae and lighting efffects some time in the near future. Also I have space for probably two more buildings in this area that will anchor that corner of the track with a nice city skyline.
WLF1 Ring - Communications Tower
Greetings from the Ring... Ring... Ring... Hello? He's racing Porsche GT3's right now. Can I have him call you back? Very good, good bye. Luca Di Montezemolo wants you to take Felipe Massa's seat in the Ferrari for the remainder of the season!
Ha! I wish...
Been a while folks so its update time. First up the new Communications/Cell Tower.
I started with a 3/8" diameter dowel and trussed the base with smaller dowels. Sintra and scrap plastic beams were used for the triangular transmitters and receivers. U shaped metal staples make up the ladder steps and all is topped off with a glowing red LED to inform any low flying aircraft to its presence. The base is a piece of 1/4 Sintra painted concrete color. Make sure that base is level otherwise the whole tower will be out of whack. Hit me up sometime now that the Ring has commmunications... 555-F1FREAK
Tuesday, March 24, 2009
WLF1 Ring - Overview March 2009
Well after all those detail shots of buildings I figured I'd better roll with some overviews. Tracks looking good from a far. A lot of people have been asking for video so last weekend I rigged up my sony handy cam on a bodiless chassis to run it around the 'ring'. I had it all rigged up with minimal vibration. The car was struggling a bit in areas but I could have made a lap at decent speed. I charged up the cam only to find it is malfunctioning so unfortuneatly video will have to wait a bit longer. I just turned to the camera to snap up some pics of my progress so far. I've got call outs for my lane changers and such now, you can probably see the bleachers I made here too. Guys like the various vantage points they offer. My favorite shots I think are from the south east corner, you get a good overview of the whole track from there.
Up and coming for the Ring: Transmission Towers, more scyscrapers behind the benetton 90 corner (I left a huge vacant area there for those), Perimeter Track Lighting, Lap and Sector Timing via a good electronic whiz watery tart type friend ;)
You never know what else, with the time I spend pondering this thing anything might show up.
WLF1 Ring - Design Buildings
More Low Relief Action!
I never liked the east side of my track. My first go was grass and weeds, kinda sloppily thrown together so I ripped it out and made the new Design Building Complex. A series of three low relief buildings. They get gradually less relief as you move down the hill to Eau Rouge. 1/4" gatorboard scored and cut once again and trimmed with wood planks, corrugated paper and train ballast for roof gravel. A new armco barrier outside the exit curbing and some trees and shrubs complete the image. A huge improvement for sure!
Subscribe to:
Posts (Atom)